Fix.
Learn.
Badge Review: Future Badge by @alt_bier
A new, possibly recurring feature: Badge Reviews! For this first installment I’m going to review @alt_bier’s DC31 Future Badge. There are NO spoilers for the puzzles in this review.
When I first spotted this badge on Twitter it looked so awesome that it immediately went to the top of my Defcon 31 wish list. Creator @alt_bier ran an indiegogo campaign that allowed sponsors to pre-order. I left that tab open for several days meaning to go back and place an order but when I finally remembered to do so the campaign was already completed and it was too late to join. @alt_bier was kind enough to let me know when he was planning to be around at Defcon, and I made sure to seek him out early so that I could claim one of these.
A few lucky people were able to secure partially- or even fully-assembled badges, but most of them were offered as a DIY kit. Personally, I love assembling these things and given an option to do the assembly myself I will always choose that option. The downside is that I did not have time while at Defcon to assemble the badge so I was not able to show it off to anyone while I was there. Which is a bit of bummer because it’s a real beauty.
Design and Art
The Future Badge’s design and artwork were inspired by Defcon 31’s theme, ‘The Future Will Prevail.’ @alt_bier was inspired to create a Back To The Future themed badge. The oblong shape with cut off corners is meant to evoke a movie theater ticket, and the front face features artwork inspired by the Back To The Future movies - the Hill Valley Courthouse with its clock tower, a sports almanac, Doc Brown, a readout from the time machine’s dashboard and as the centerpiece the Delorean depicted just as it is hitting 88MPH. Centered above it is ‘The Future Will Prevail’ in a style reminiscent of the title graphic from the movies. There are also a few ciphers silkscreened onto the front that can be solved.
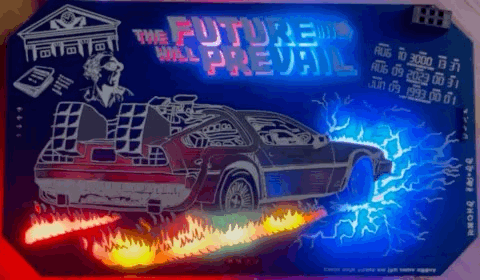
The Delorean itself is a shiny silver capacitive touch interface that evokes the stainless steel exterior of a real Delorean, and also serves as a way to interact with the badge, enabling its CTF mode. Other details are silkscreened on and have a hand-drawn look that I love.
Finally, there are voids in the solder mask under the slogan, the flaming tire tracks and the sparks coming out of the front of the car. These translucent sections allow the LEDs to shine through. This technique shows up frequently in badges and SAOs, often to beautiful effect. @alt_bier put together a lovely light show on this thing. The logo changes colors, the flaming tire tracks flicker, and the lightning on the front of the car flickers and then bright strobes flash giving you the impression of the Delorean hitting 88MPH and jumping through time.
It even comes with a matching lanyard.
Hardware
Badges with multiple stacked PCBs seem to be a current trend in the #badgelife scene. I picked up 3 such badges at Defcon 31 and a few others in the year or two prior. It allows for some really cool visual effects, and also offers a clean look as it allows the designer to hide all of the components between the boards.
The Future Badge has two PCBs. The bottom board holds the brains of the operation (an ESP32), along with 4 WS2812 addressable RGB LEDs, 4 red/yellow LEDs, 4 blue LEDs, 2 white LEDs, a voltage regulator, a power switch, a transistor and an assortment of resistors and capacitors.
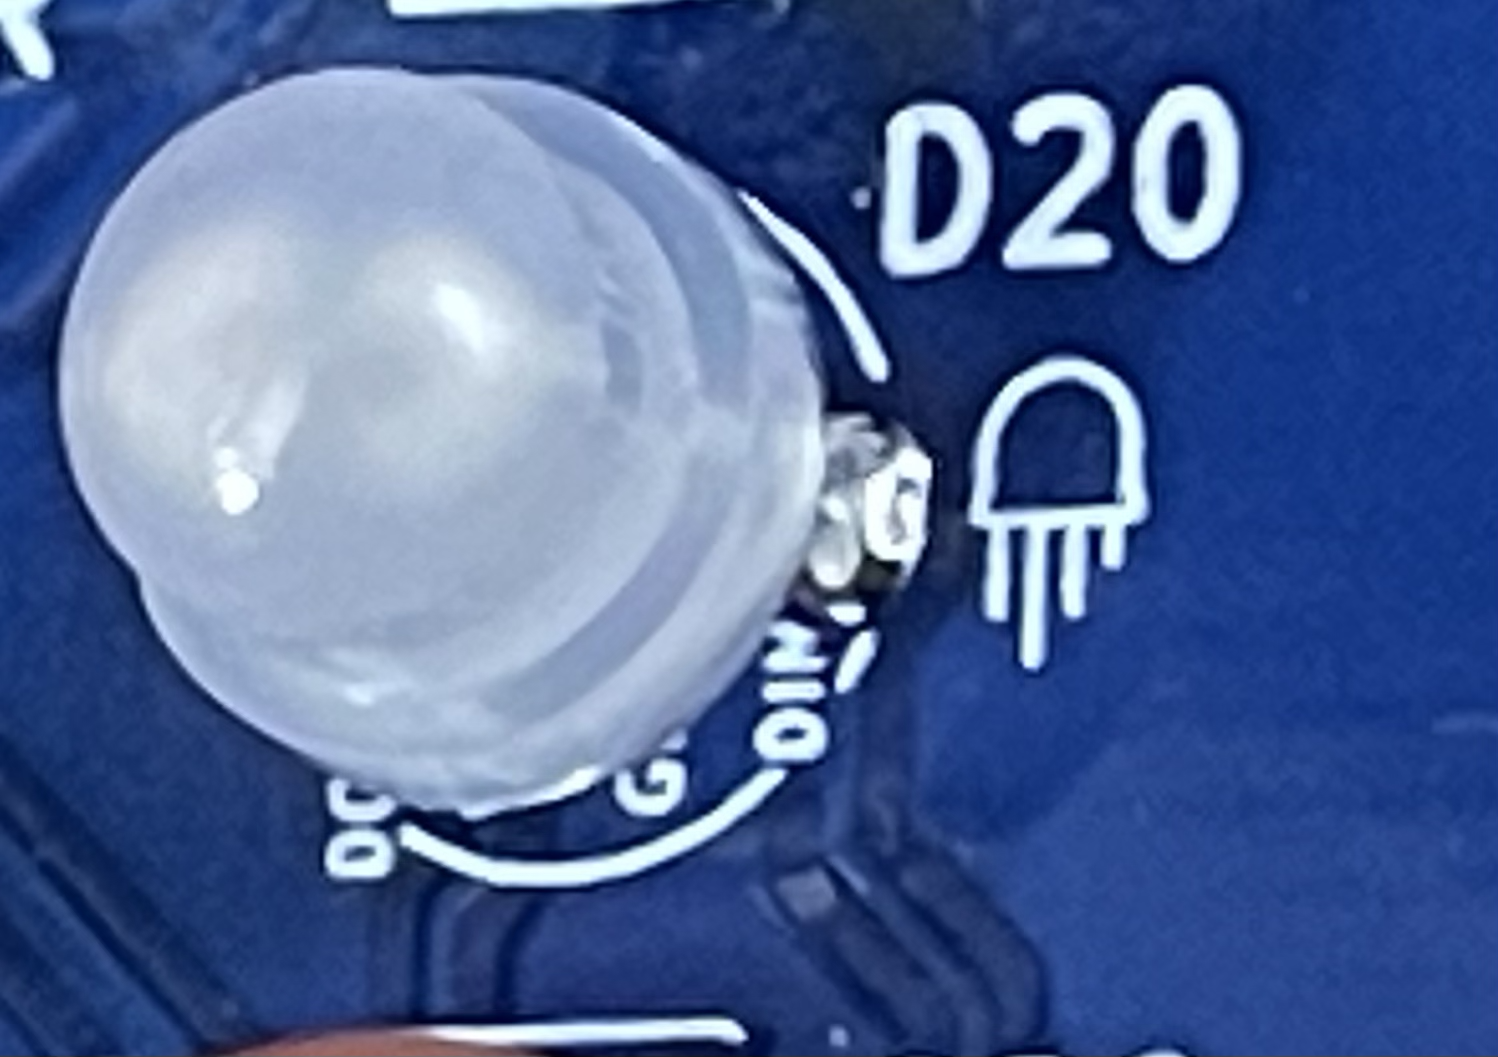
It’s clear that @alt_bier was very intentional in the design of the board, keeping the difficulty low enough that it can be assembled even by people with minimal soldering experience. There are only four surface mount devices and they are all reasonably large. All of the other components are through-hole. For the LEDs which are polarized and must be inserted in the correct orientation, @alt_bier had helpful little pictures silk screened right onto the board showing the correct orientation.
He also included a URL on the back of the board that reveals lots of background information, source code and schematics, step-by-step assembly instructions, and an assembly video. He also has a whole series of videos about the design process on his youtube channel so be sure to check that out if you want an inside look at what goes into designing and building a badge.
The top board features an SAO connector as well as the pins that attach it to the back board.
The whole operation is powered by a 9v battery, which is pretty unusual on the #badgelife scene. @alt_bier shares some of his thoughts about that on the website.
Software
What’s even better than a pretty badge? A pretty badge with some puzzles! The ESP32 has onboard wifi. If you touch and hold the capacitive pads for ~30 seconds, the lighting will change, indicating that the badge is in CTF mode. When CTF mode is enabled, the badge acts as a wifi access point. Connect to its ‘FUTURE-BADGE’ network (the first puzzle is figuring out the password) and there are a few little hacking puzzles on there, all tied in with the Back To The Future theming. The puzzles are not super difficult, although I had bit of trouble getting started because one of things I initially tried quickly overwhelmed the badge and crashed it. If you run any automated processes against the badge, it’s probably a good idea to run them in a single-thread / low-speed configuration. You might also consider plugging it in while you CTF it so that you do not have to burn through batteries. I was not able to power it from a Mac or a powered USB hub, but a 5v/3A adapter from a Raspberry Pi 4 worked nicely. Be sure to remove the 9V battery before plugging it in.
I believe @Sapient4Sec assisted with coding the CTF. If you’re stumped on the CTF, take a look at my walkthru.
Final Thoughts
A really beautiful badge. It’s thoughtfully designed, easy to assemble and has some nice puzzles to go along with it.
At the time of this writing it looks there are still a few available on @alt_bier’s eBay store. If there are none left, fear not. The badge is fully open source with everything you need to get your own printed available on github.