Fix.
Learn.
Even More Xiegu G90 3D Printing
I am back and I have designed another 3D printed part for my Xiegu G90.
Schlepping the Station
It’s been about 6 weeks since my last post where I showed off the clip-on mic hook that I designed for the G90. Since then, the snow has melted and I’ve been able to use it a bit more. I’ve been trying to squeeze in quick radio sessions here and there and even a couple times I set up and operated during my lunch break during the work day. As I’ve been setting up and breaking down more frequently, I’m also more frequently schlepping the whole setup up and down the steps sometimes more than once in a day, and I’ve started to think about how to improve that process.
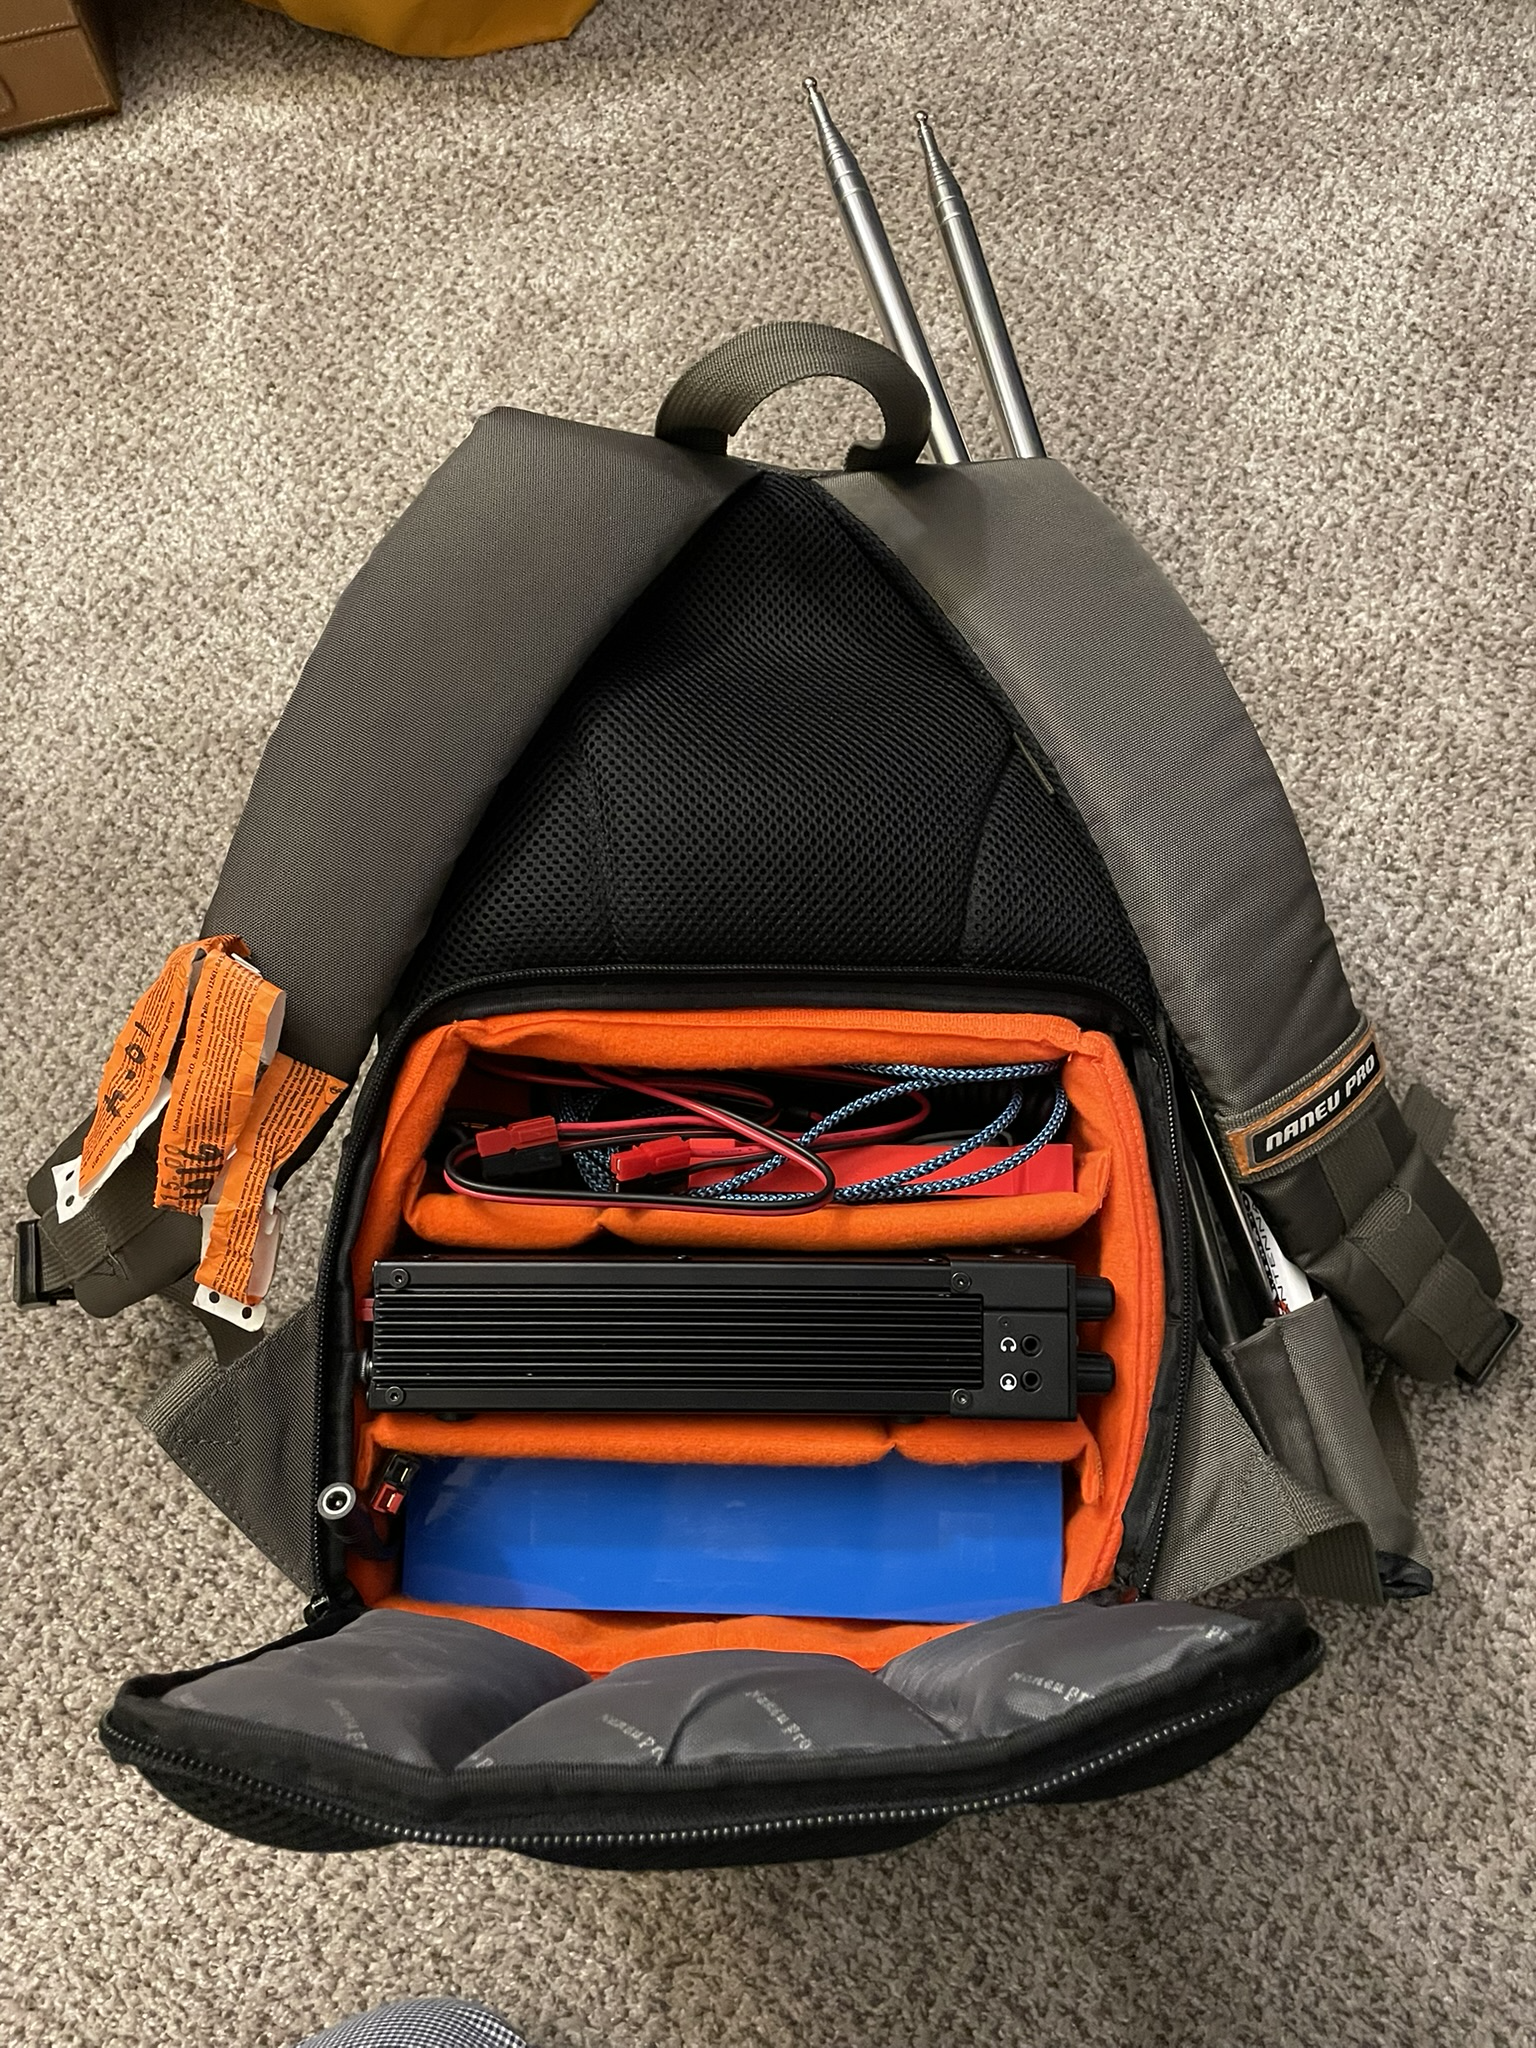
For the past couple months I’ve been keeping the antenna parts, coax cable, headphones and miscellaneous parts in a tote bag and the radio in the box that it came packaged in. I would carefully slide the radio in its box along with the battery into the tote bag, trying not to damage anything else that was in there, and carry all that in my hand (plus a laptop). It’s cumbersome, and it’s awkward - the tote bag does not stand up on its own, the foam padding in the radio box is getting damaged from repeatedly loading and unloading the radio, there’s no organization in the tote bag, etc. Just going downstairs with it was annoying enough … if I were to use this setup for a POTA activation it would be a real drag. This all got me thinking about how best to store and transport my radio setup.
The Bag
Well, just the other night something popped into my head. I still have an old DSLR camera that no longer works. That camera lives in a stealth camera backpack. It’s pretty cool … it looks like a regular backpack but on the part that faces your back there’s square zippered opening with a configurable padded cube behind (so thieves can’t get to it while you’re wearing it).
It has a lot of removable padded dividers so that it can securely hold all different shapes and sizes of cameras, lenses and other gear. It’s also got a little zippered compartment on one side that conceals a bit that can hold a tripod (but you’re decidedly less stealthy if you’re visibly carrying a tripod). I wondered if maybe my radio setup could fit in that backpack, so I went and gave it a try, and it more or less works!
It’s a tight fit. The battery and the radio both fit into sections of the padded compartment and there is enough room left in that section for the microphone, power cord and the serial and USB cables that come with the G90. The upper backpack compartment is just big enough to accommodate the Hesh 2 headphones I’ve been using, along with the mic hook and a small rubber mallet in case I need to pound the antenna spike into hard ground. The ground spike and the antenna whips fit decently in the tripod holder. The front pockets hold the antenna transformer, manuals, antenna wires and the 3D printed stand and speaker redirector.
It’s a pretty workable solution for now, until I can get a better backpack or other storage/transport medium. Except for one thing: The radio is just a little bit of a tight fit in that padded camera cube. Width-wise it just barely leaves enough room to close the zipper. I was able to get a bit more of a comfortable fit by removing the metal grab loops on the front and back corners, but I found that the knobs and buttons on the front face are right up against the padding and if you push on the side of the backpack you can feel them click in. This didn’t seem like a great thing for the mechanical parts of the radio. I needed some way to protect those parts while it was in the bag. I try not to be the “3D printing is the solution to all life’s problems” type of person, but it’s certainly good for certain specific problems like this!
Whenever I see a need to 3D print something, I go looking online for it first because someone has probably already sorted the problem out better than I can. There’s no sense reinventing the wheel! There were a couple decent looking designs on Printables but both of them made use of the front grab loops as retaining clips, so they were non-starters for me since I needed to remove them to make the radio fit. Since there weren’t any suitable designs, I guess I would have to make my own! Luckily I’m starting to get the hang of using FreeCAD.
Design
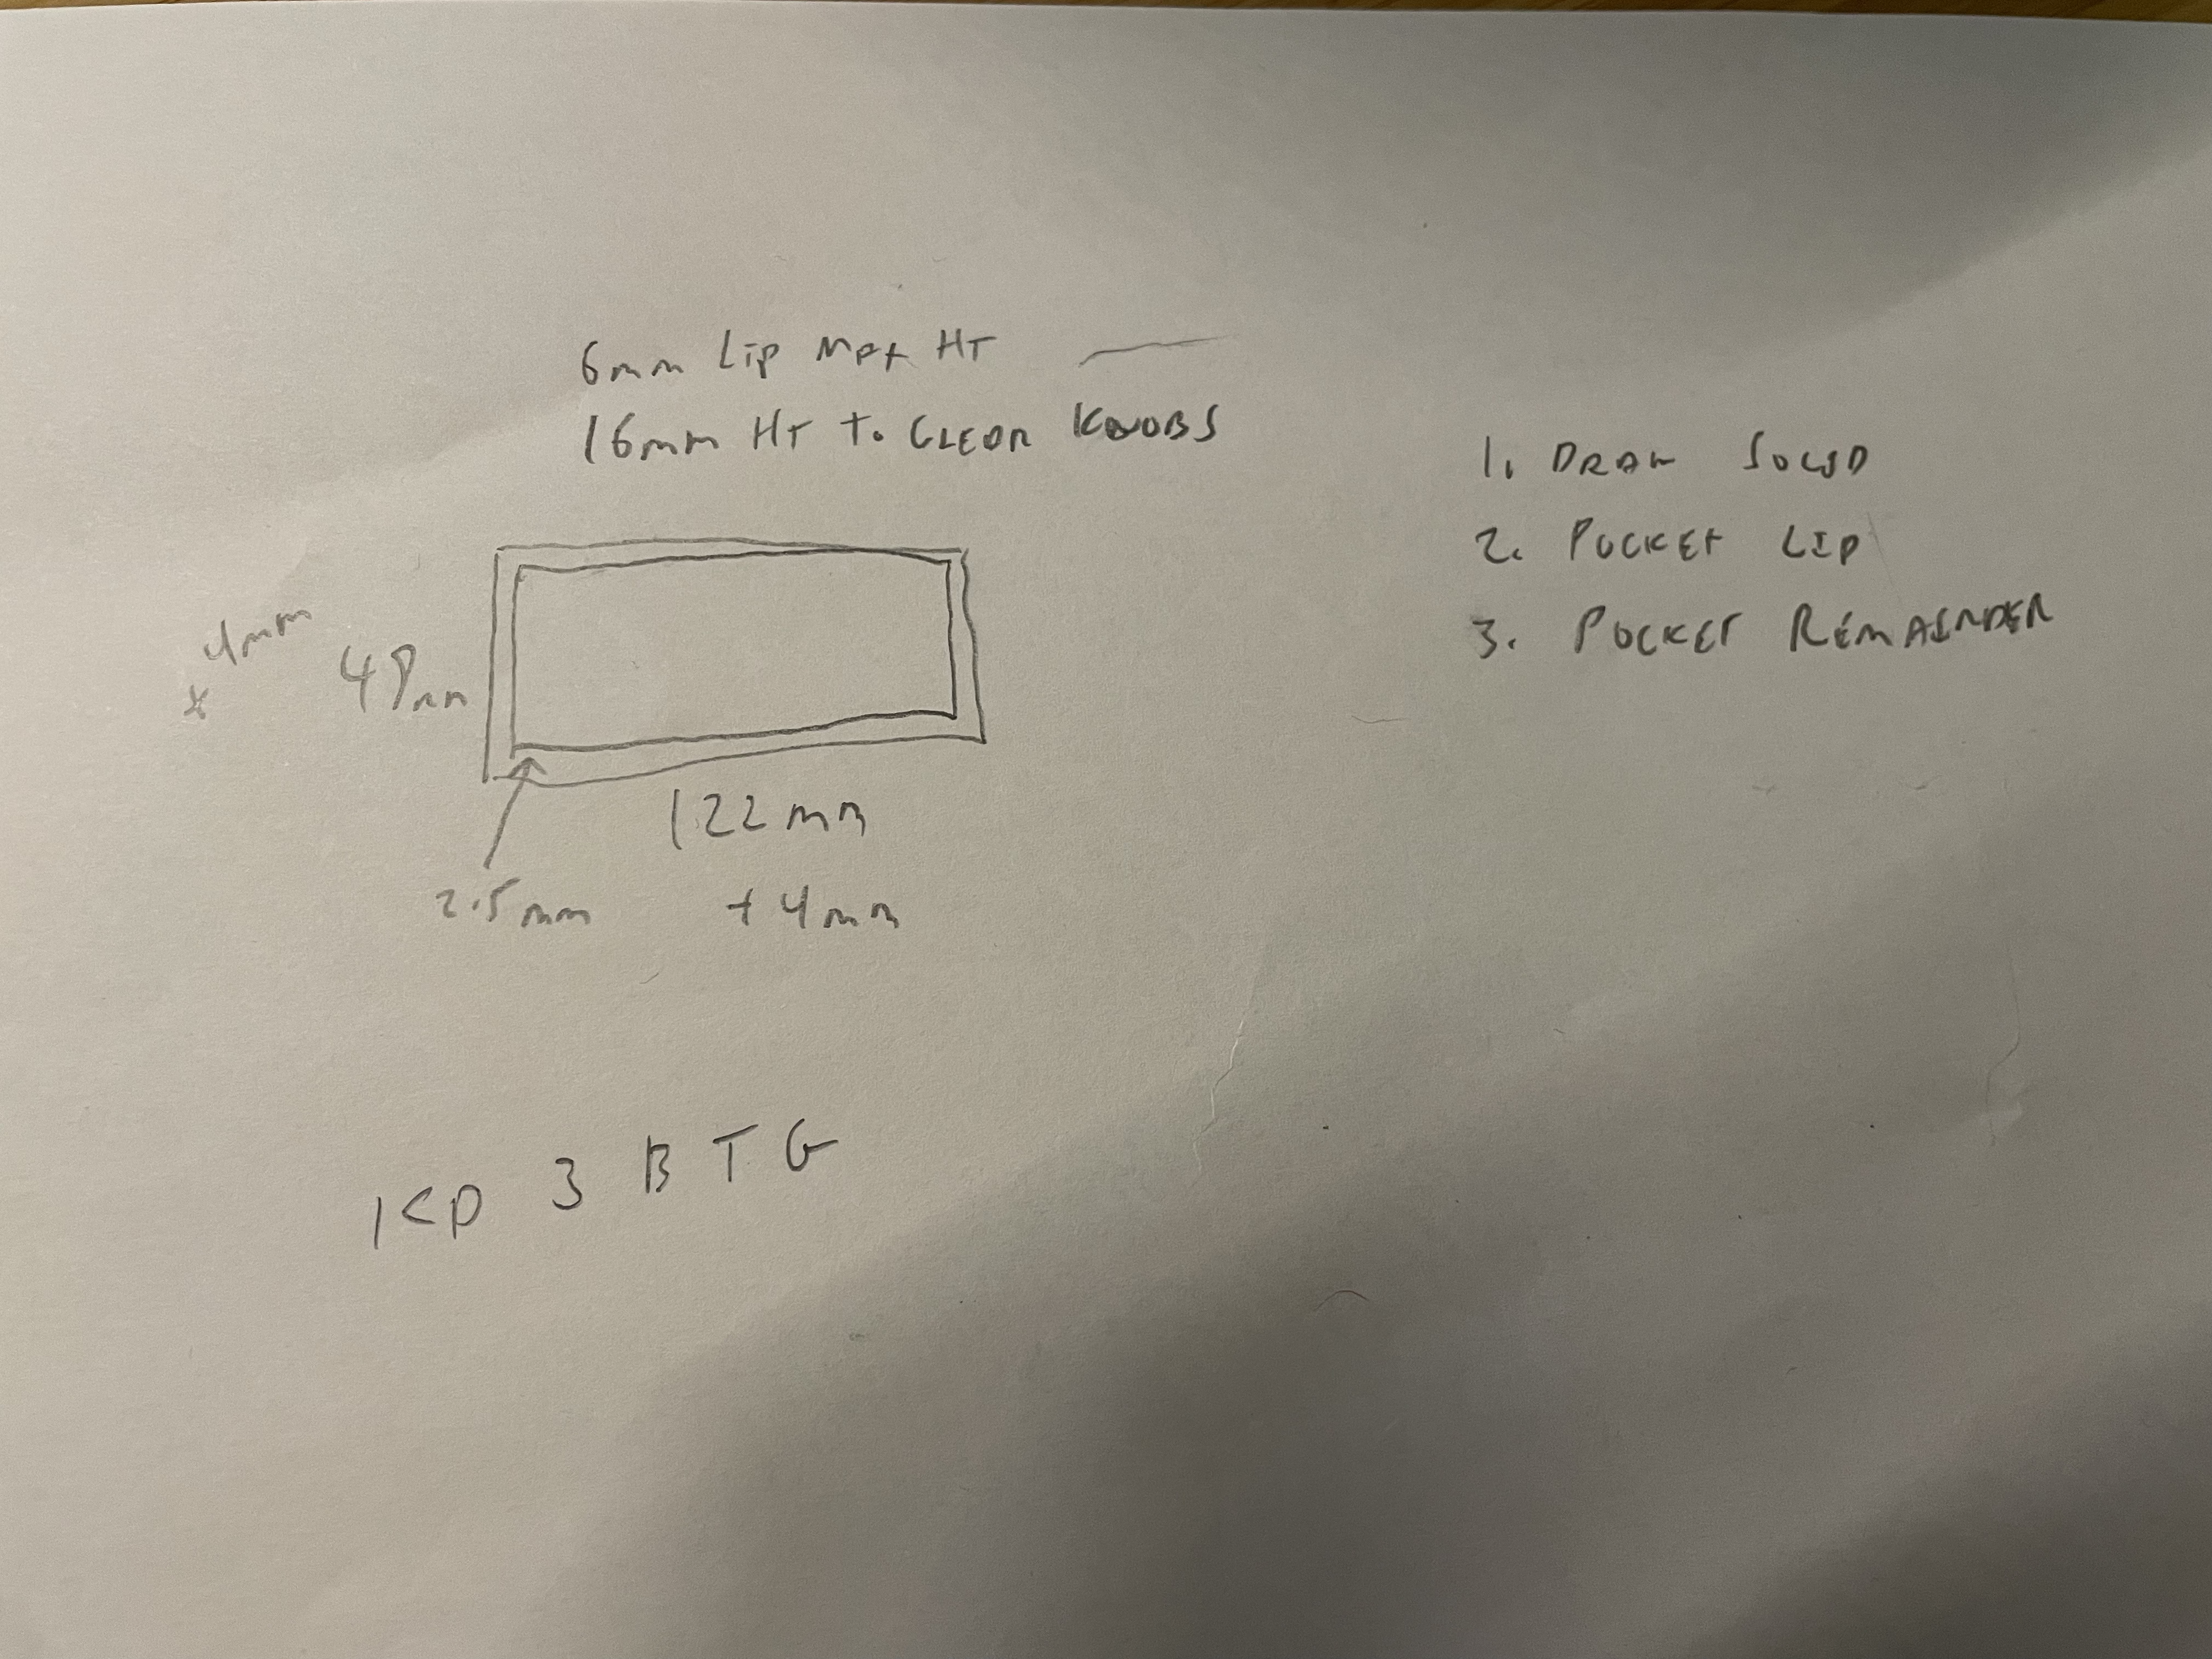
I started off with a quick pencil-and-paper sketch of what I had in mind. I envisioned a basic box with an opening one side large enough to slide over the front of the radio and closed on the other side to cover the knobs and buttons. On the inside of the box there would be a lip that would go against the front face, wide enough to keep it from sliding on too far and compressing the knobs, but not so wide that it would press any of the buttons close to the edge of the face. The lip would extend as far back around the body of the radio as possible without pressing the buttons on top of the radio. The closed end of the rectangle needed to be far enough from the edge of the lip to keep it from pressing on the knobs, but no farther than necessary since saving space was an important consideration. I took some measurements with my digital calipers (this is an inexpensive and indispensable tool for anyone involved with 3D printing) and drew up the sketch on paper.
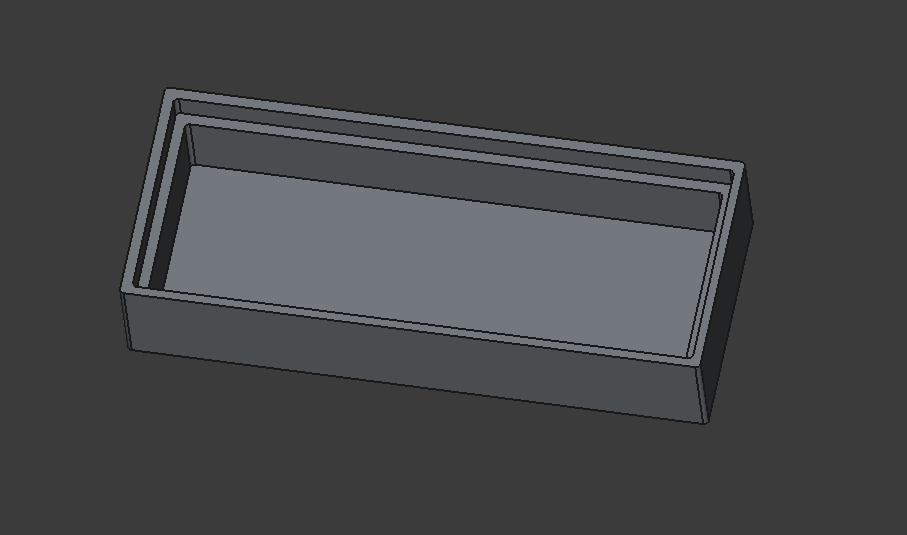
Next it was time to think about the design in CAD. Like drawing pictures, it’s helpful in CAD if you can imagine your part as fundamental shapes like rectangles and triangles and spheres. As I have mentioned in previous posts, it’s also important to think about the limitations of 3D printing. For example, I would need to print the box with the closed end on the bed of the printer. The lip would then also be parallel to the print bed. If I wanted to just have a lip sticking out of the side walls, it would not work without adding supports. After a bit of pondering I came up with my plan. I would build a rectangular prism representing the entire box. I would then carve out, or “pocket” in FreeCAD terminology, the rectangular area that would be from the lip to the open edge of the cover. And then from the remaining solid, I would pocket out a smaller rectangular void that would be the space that covers the knobs. It was very easy to do in FreeCAD. I used a FreeCAD Spreadsheet to parameterize all of the dimensions so that they could easily be changed. Future t.fish would later appreciate this gift from past t.fish but for now, it was ready to print!
Test Prints
Now if you’ve read either of my past posts on printing parts you’ve designed, you may recall that I strongly recommend doing test prints where possible. Before printing this whole box, I wanted to make sure that it would actually fit over the front of my radio! When you’re making parts that have to fit other things there is a lot that can go wrong whether it’s issues with the design or even the calibration of the 3D printer. I wanted to print just the lip and the upper part of the box that goes around the radio to make sure that opening actually fit, the lip did not press any buttons and that it did not extend too far back. To do this, I simply exported my model, and then in the slicer I adusted the Z axis so that most of the box was below the print bed, leaving just the part that I wanted to print above the bed. I sent this to the printer and 45 minutes later I had a tester.
It did not fit.
I am not sure what I did when I set this thing up in FreeCAD but I ended up with the opening being just a bit too small to fit around the radio. Remember how past t.fish had parameterized the dimensions? Well fixing this was easy - I simply went into the Spreadsheet and adjusted the appropriate dimensions. FreeCAD also has a measuring tool that will tell you the distance between any two elements, so I used that to double check, and once I had the opening sized at the dimensions of the face, 122mm x 46mm, I sent it back to the slicer and then the printer. 45 minutes later I had my second tester.
It did not fit.

Ok this time I made a really silly mistake. The face of the radio is 122mm x 46mm. I made the opening on the cover 122mm x 46mm. But in order for the cover to fit around the face of the radio, it obviously would need to be slightly larger than the face! DUH! So I tweaked it a bit larger, and back to the slicer and printer. 45 minutes later, I had my third tester.
This one fit around the face of the radio but it was a little bit tight. I had to work it quite a bit to get it on and off. Also now I could see where the lip pressed on the face and it was a bit too wide and was pressing against the buttons along the bottom. One last tweak of those dimensions, a slice and a print and 45 minutes later I had my fourth tester.
This one was a winner. It fit on snugly but was not difficult to put on/take off and the lip got good purchase on the face without pressing any of the buttons, and it stopped short of the buttons along the top. Success! At this point I realized that I had probably made the same silly mistake on the depth of the box, which was exactly the same as the height of the tallest knob, so I added a millimeter to that dimension, sent it off to the slicer and printer and four hours later it was ready to go!
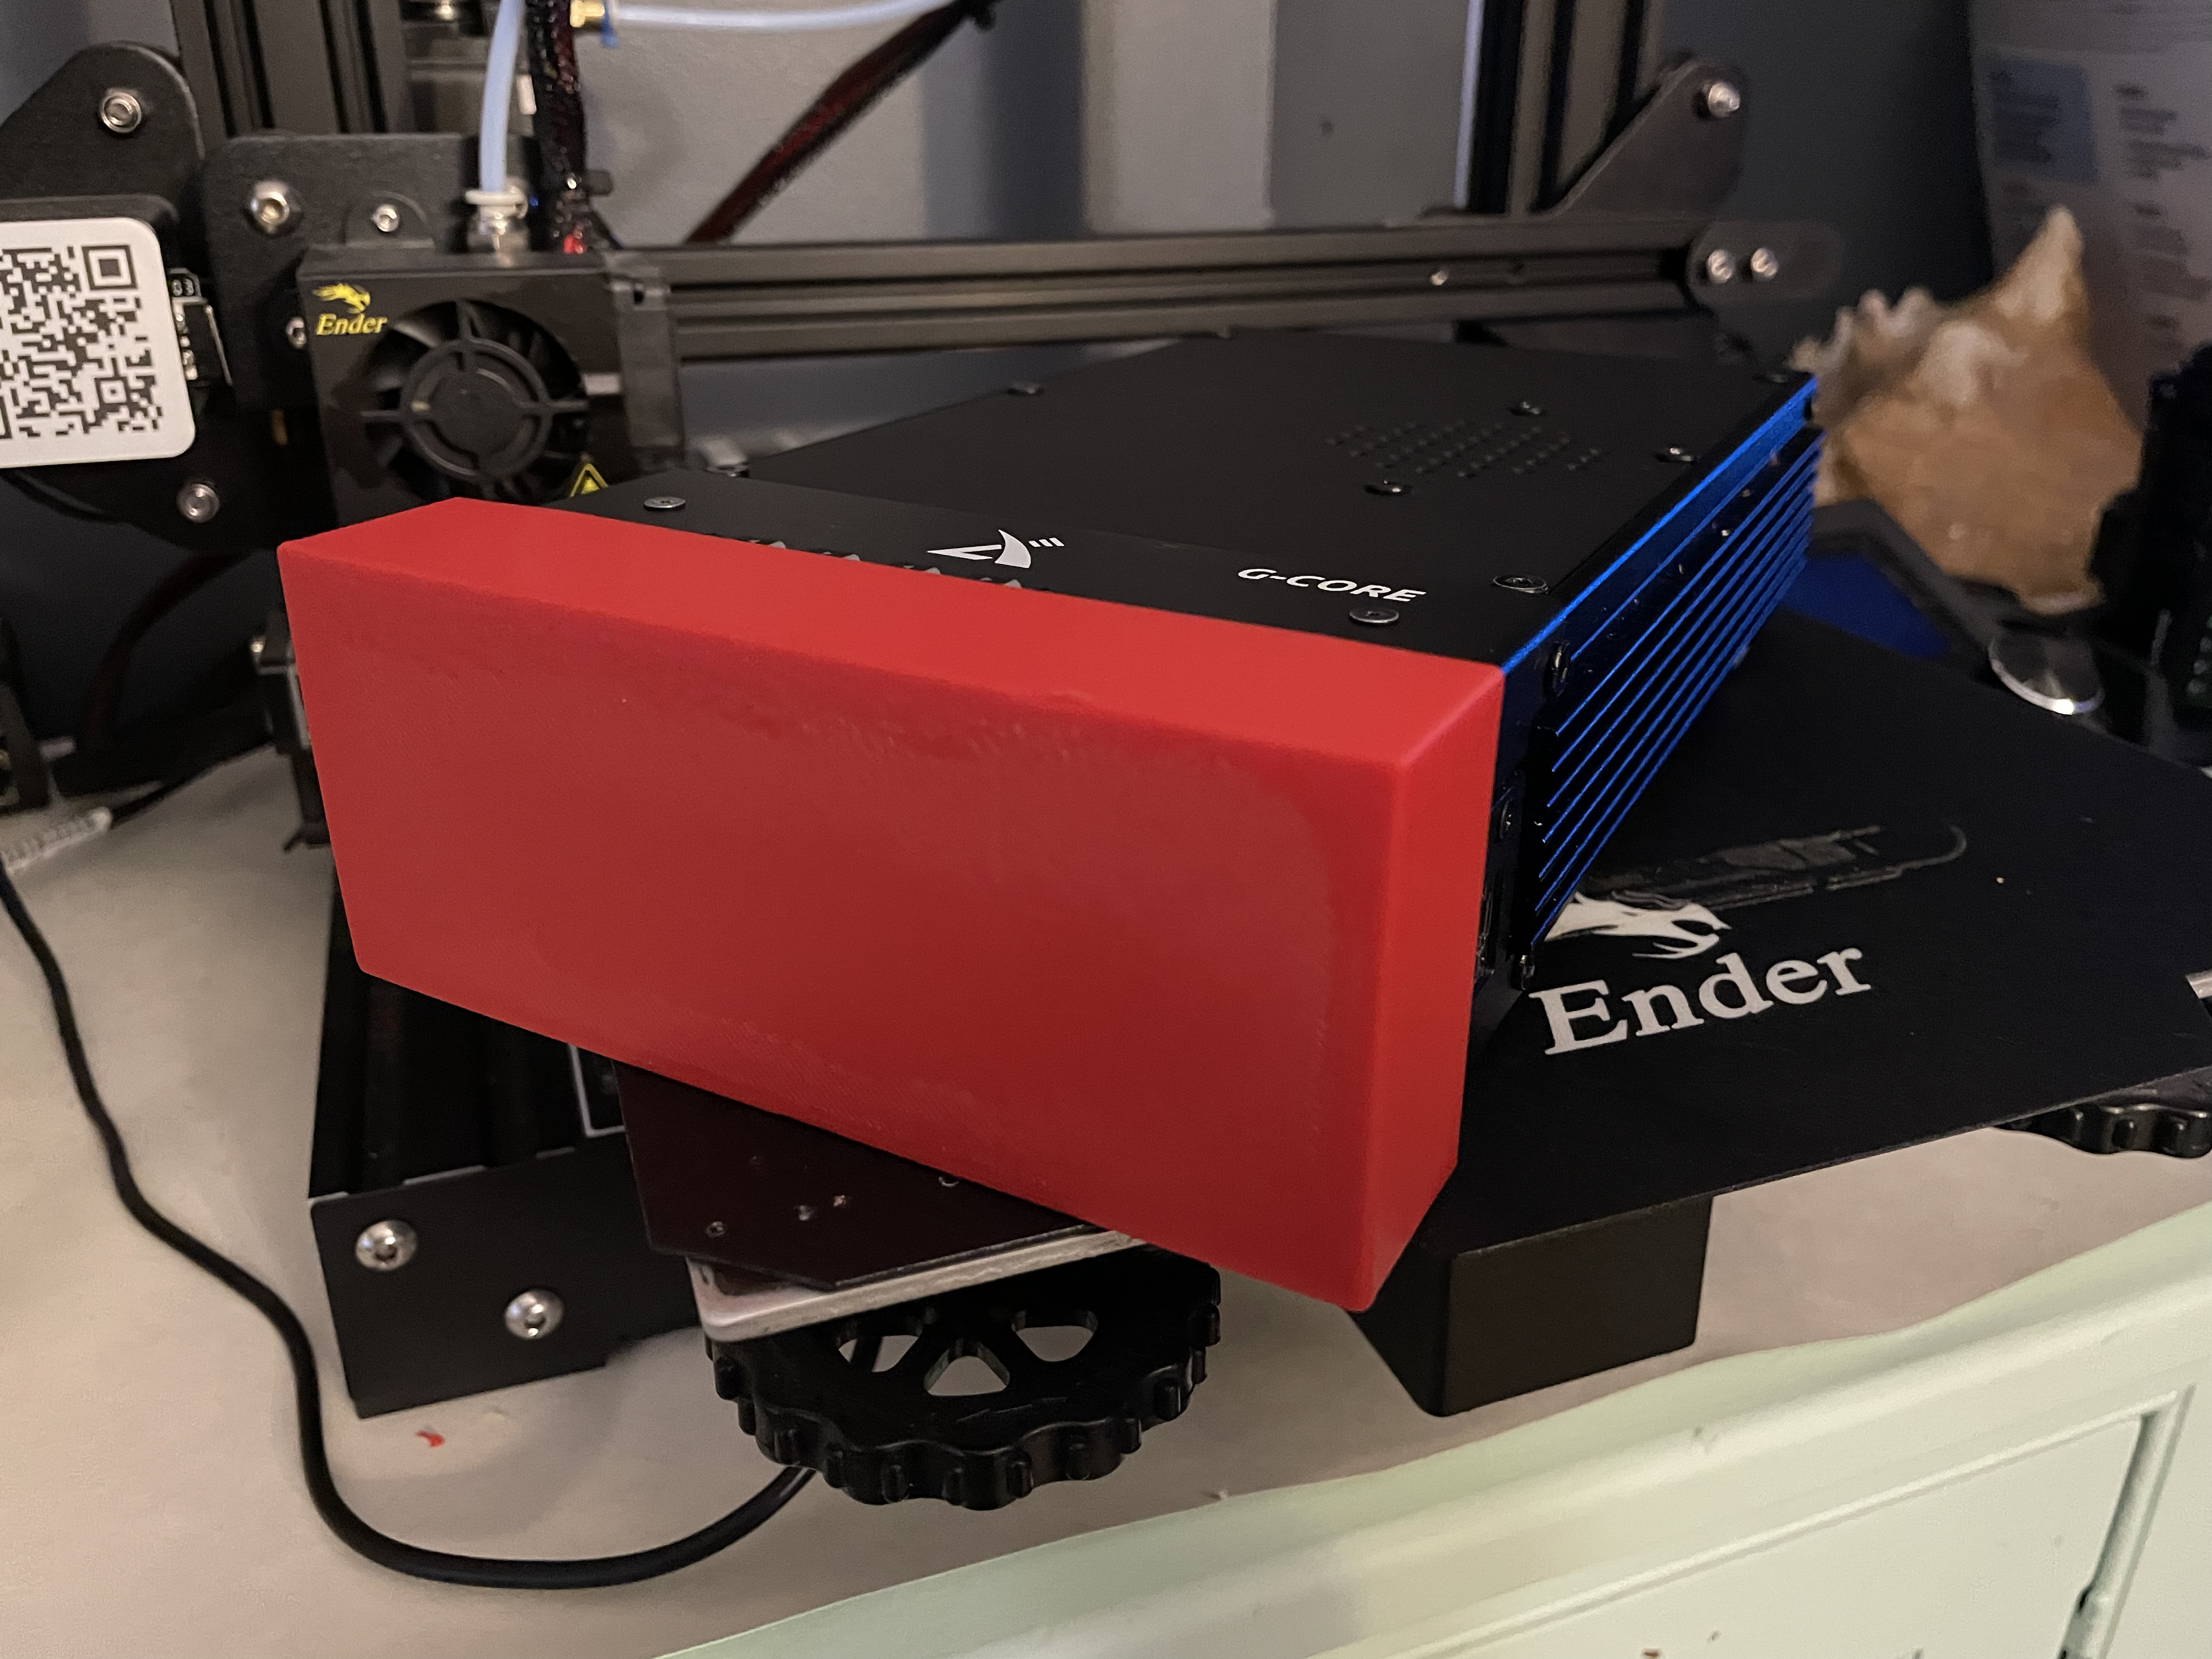
I was very pleased with the result. The fit was perfect and as luck would have it there are two screws on the top of the case that stick up just the slightest little bit. The cover clicks over them to get just a tiny bit more tension to keep it on. There was one thing that bothered me, though … the big flat expanse of space felt like it needed something. Like my call sign maybe? I had considered debossing the letters into the face when I dreamed it up, but it’s not possible to deboss the underside of a surface when 3D printing. Maybe it’s possible, but I imagine it involves a lot of post-processing to make it look half decent. Now, if I had a nicer printer that could easily print multiple colors, then I could have it print the letters in a different color, or perhaps use a different material as support for the debossed letters. It seemed like too much hassle so I abandoned the idea.
Customizing the Cover
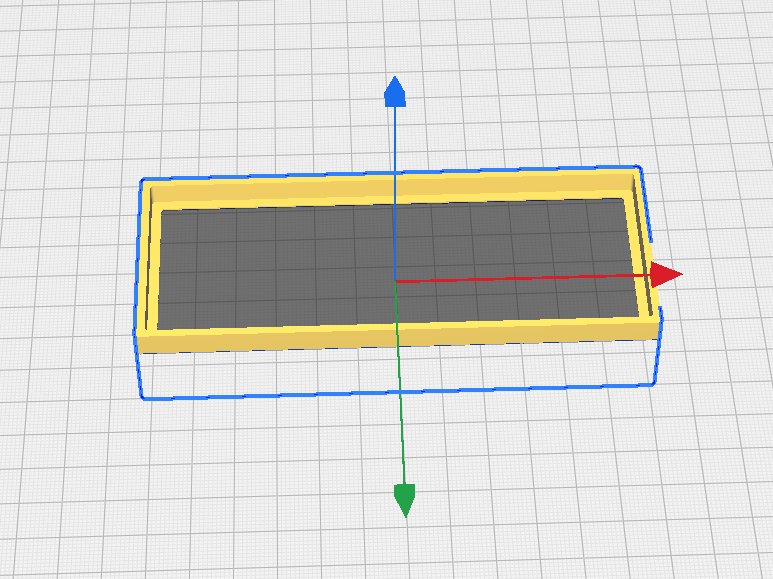
But now, seeing the printed part in real life I realized I could just punch letters right through the surface and that would print just fine on any printer. I knew it was pretty trivial to work with letters in Fusion but I was not sure about FreeCAD. I certainly had not come across a tool to do it in my travels thus far. However, a quick web search revealed a handy tutorial to do just what I had in mind. I needed to find a stencil font because my call sign has a ‘D’ and ‘B’ which need to have connections back to the outer surface in order to not just print as vaguely letter-shaped holes. Another web search turned up a good font candidate.
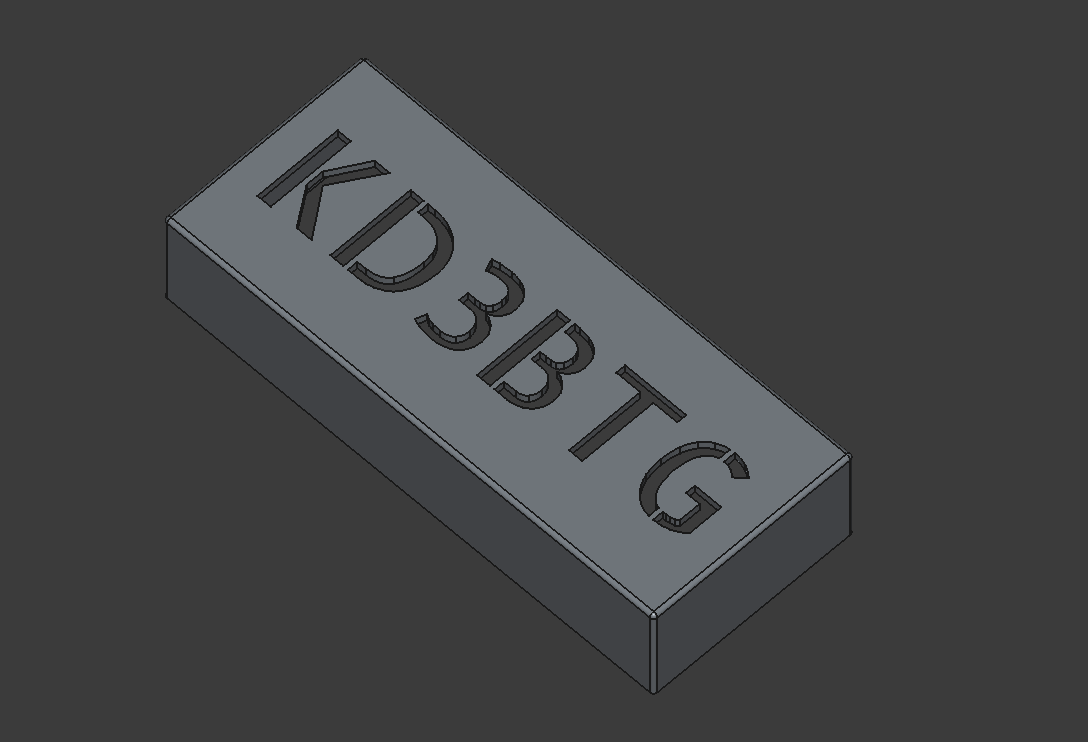
I downloaded that, followed the tutorial, and after a little bit of messing around to get the orientation, spacing and alignment correct I was ready to send this to the slicer. If I wanted to be extra cautious I could have printed just the surface with the letters but I was pretty confident that it would come out ok…and it did!
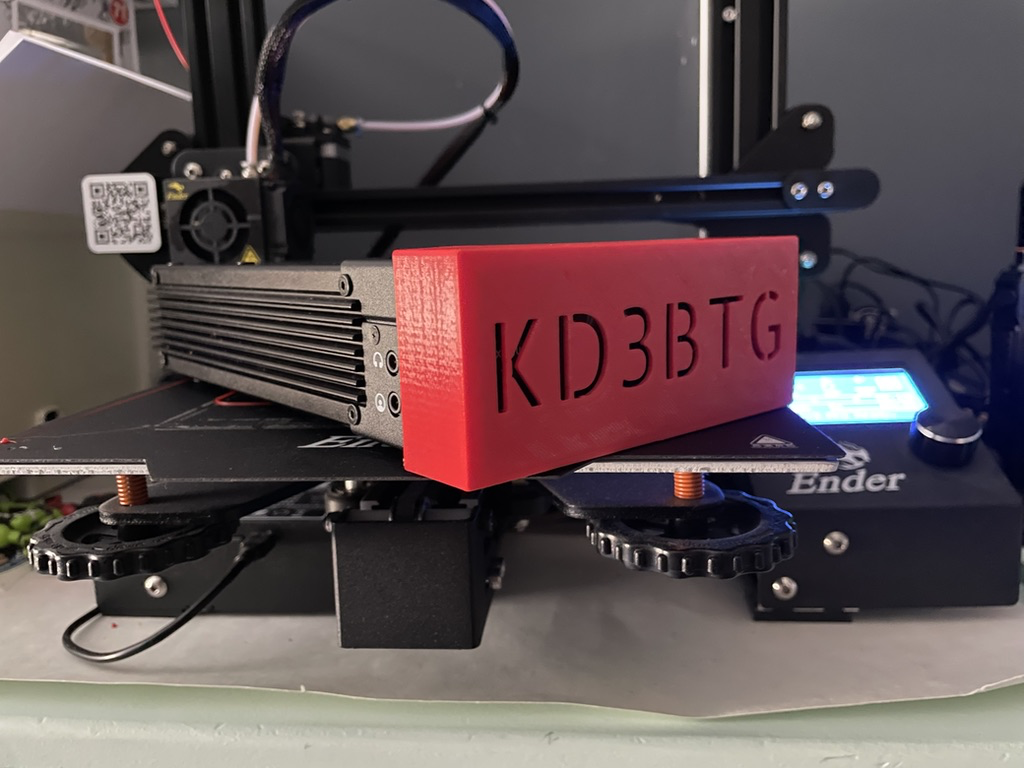
Now I’ve got a nice-looking cover with my call sign to protect the buttons when the radio is in the backpack. Awesome! Someday I may modify this so that it can work with the loops attached. I think I can trim away the sides enough to allow them to fit and still have the cover stay on reasonably well. I could also cut away some of the lip, for example just having the lip in the corners, to allow it to print faster and use less plastic. But for the moment it’s exactly what I need and I’m leaving it be.
Print Your Own
Do you want to print your own? I have shared it on Printables. I included both an stl of the plain cover and a FreeCAD file of the stenciled version in case you want to try your hand at customizing it with your own call sign.